Run models using payu
About
payu is a workflow manager tool for running numerical models in supercomputing environments. It is an open-source software, distributed under an Apache 2.0 Licence.
This page summarises the payu capabilities that are most commonly required to run ACCESS models on the Gadi supercomputer. This page presents generic information on:
- terminology for payu-based experiments
- the setup of payu
- running a payu-based experiment
- monitoring a payu-based experiment on Gadi
- modifying a payu-based configuration for the most commonly customised aspects
Info
This page is to be used in conjunction with the Run a Model page for the chosen model. The Run a Model page provides model-specific information, including configuration names and locations. It also describes configuration customizations that apply specifically to the chosen model.
For in-depth information about payu, check its technical documentation.
Terminology
Before explaining how payu works for the ACCESS models, it is worth explaining the difference between configurations and experiments as well as the terminology for the data organisation for payu's experiments.
Configuration versus experiment
The terms configuration and experiment are not interchangeable although they are closely related.
A configuration defines a specific way to run the model it relates to. A configuration is defined by:
- model version and build (model executable(s))
- set of input files (ancillaries, forcings, restarts)
- set of physical and modelling options for each model component (namelists, configuration files and MPI layout)
Changing any one of these elements creates a new configuration
An experiment is a realisation of a configuration: a series of sequential runs that generate model data over a span of model time.
Data organisation and payu's directories designation
Info
payu creates all the directories it needs. Therefore, they do not need to be created beforehand.
The data organisation for payu was chosen to separate the smaller text files that define a configuration and the larger binary input and output files needed for an experiment.
This means the configuration definition can be tracked with git, and so is easy to back up and share. It also optimises the use of different filesystems on high-performance computers. Finally, this layout ensures several experiments that share common executables and input data can be run simultaneously.
A representation of the data organisation for payu is given in the following diagram:
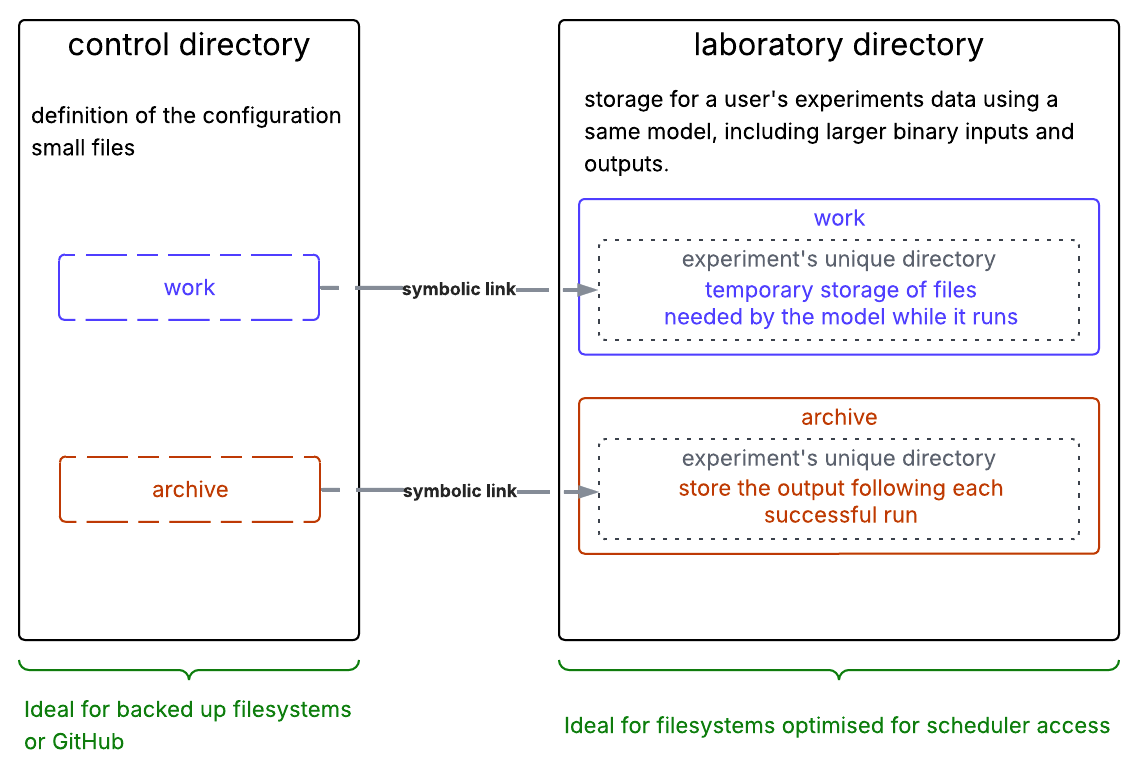
As shown in the diagram, the general layout of a payu-supported model run consists of two main directories:
- The control directory contains the model configuration and is the directory from which the model run is started.
- The laboratory directory contains all data from payu experiments of the same model. By default, it is
/scratch/$PROJECT/$USER/<model_name>.$PROJECTand$USERare environment variables on Gadi that points to your default project and your username respectively. See the section on modifying the PBS resources to learn how to change the laboratory location.
On Gadi, it is good practice to put experiment control directories in your $HOME directory as this is the only filesystem that is actively backed-up. There is a 10GB limit for home directories, but the control directory only contains text files and symlinks, and so uses relatively little space (<1MB). The laboratory directory is on /scratch which is optimised for fast I/O for large data and where there is adequate space available for large model output.
Inside the laboratory directory, there are two subdirectories of particular interest:
work→ for temporary storage of files needed by the model while it runs. payu creates and removes directories and files in this directory upon successful completion of runs. It is left untouched in case of error to facilitate the identification of the cause of the model failurearchive→ for storing the output following each successful run. The output, log and restart files are automatically transferred fromworktoarchiveupon successful completion of runs.
Within each of the work and archive directories, payu automatically creates a unique subdirectory for each experiment. Output and restart subfolders are called outputXXX and restartXXX, respectively, where XXX is the run number starting from 000. Model components are separated into subdirectories within the output and restart directories.
The archive and work directories for an experiment are most easily accessed through the symbolic links created in the control directory.
Warning
Files on the /scratch drive, such as the laboratory directory, might get deleted if not accessed for several days. All experiments which are to be kept should be moved to /g/data/ by enabling the sync step in payu. To know more refer to Syncing output data.
Prerequisites
-
NCI account
Before running an ACCESS model, you need to Set Up your NCI Account. -
Join NCI projects
Join the following projects by requesting membership on their respective NCI project pages:For more information on joining specific NCI projects, refer to How to connect to a project.
Warning
Different model configurations will likely require you to join additional projects. Please refer to the Run a Model page of your chosen configuration for the list of additional projects.
Payu setup
Payu on Gadi is available through a dedicated conda environment in the vk83 project.
After joining the vk83 project, load the payu module:
module use /g/data/vk83/modules
module load payu
To check that payu is available, run:
payu --version
Run an experiment
Get the model configuration
All model configurations are hosted in a git repository on GitHub, and each configuration is stored as a separate branch of that repository.
To get a local copy of a configuration, you need to:
- identify the
<repository>and<branch>name the configuration is stored under on GitHub. See the information on the Run a Model page of your chosen model for this step. - decide where on Gadi to store all your payu experiments,
<configurations-directory>, typically a folder under $HOME. This directory must exist before running payu. - decide on a name for your experiment,
<local-branch>. It is recommended to choose a descriptive name, specific to your experiment. - decide on a directory name to store the experiment,
<control-directory>(created by payu). Thecontroldirectory is a git repository. Experiments are saved as branches in this repository, making it possible to use the samecontroldirectory for several experiments. For this reason, we recommend to always set the<local-branch>. For more information refer to this payu tutorial.
Then, you can get the chosen configuration using payu clone.
For example, say you want to do a sensitivity experiment to the diffusivity in ACCESS-OM2 using the configuration release-1deg_jra55_ryf. You decide to:
<repository>and<branch>: base your experiment off the branch,release-1deg_jra55_ryf, from the repository,https://github.com/ACCESS-NRI/access-om2-configs<configurations-directory>: store the all your ACCESS-OM2 configurations under~/access-om2/<local-branch>: name your experimentdiffuse_test1-1deg_jra55_ryf<control-directory>: store the configurations for this research project underdiffuse_exps-1deg_jra55_ryf
To get the configuration as chosen, run:
mkdir -p ~/access-om2/
cd ~/access-om2/
payu clone -b diffuse_test1-1deg_jra55_ryf -B release-1deg_jra55_ryf https://github.com/ACCESS-NRI/access-om2-configs diffuse_exps-1deg_jra55_ryf
cd diffuse_exps-1deg_jra55_ryf
Tip
Anyone using a configuration is advised to clone only a single branch (as shown in the example above) and not the entire repository.
Test the configuration
To verify everything is set correctly, it is recommended to first test the configuration as-is.
To run the configuration, execute the following command from within the control directory:
payu run
This will submit a single job to the queue.
Tip
payu run will error out if a non-empty work directory for your experiment already exists (from a failed attempt or from running payu setup).
You can add the -f option to payu run to let the model run in all cases and delete any existing data under work.
Run the experiment
An experiment consists of a series of subsequent runs with each run continuing from where the previous one ended.
To conduct an experiment, use the -n option to submit a series of runs until the desired length of the experiment is reached:
payu run -n <number-of-runs>
This will run the configuration number-of-runs consecutive times for the configured run length. This way, the total experiment length will be run-length * number-of-runs. The run-length, or length of each individual run, is set in the configuration. The way to set the length of each run is specific to each model, refer to the Run a Model page for your chosen model to learn how to modify the length of each run.
For example, to run an experiment for a total of 50 years with a run length of 5 years, the number-of-runs should be set to 10:
payu run -n 10
Monitor the experiment
payu provides the payu status command for monitoring jobs (see documentation). This command can return the scheduler job ID, and the stage the payu run is currently at. When the job is complete, it displays the exit statuses from the model and overall payu run, and points to the PBS log files.
Note
payu status is available in payu versions 1.2.0 and later. This command does not yet support monitoring post-processing jobs from the configuration, e.g. payu collate and payu sync.
Alternatively, you can also use the PBS job-ID to monitor the job using the PBS commands available from NCI.
To print out information on the status of a specific job, you can execute the following command:
qstat <job-ID>
To show the status of all your submitted PBS jobs, you can execute the following command:
qstat
The default name of your job is the name of the payu control directory.
This can be changed by altering the jobname in the PBS resources section of the config.yaml file.
S indicates the status of your run, where:
- Q → Job waiting in the queue to start
- R → Job running
- E → Job ending
- H → Job on hold
If there are no jobs listed with your jobname (or if no job is listed), your run either successfully completed or was terminated due to an error.
For more information, check NCI documentation.
Stop a run
If you want to manually terminate a run, you can do so by executing:
qdel <job-ID>
Tip
If you specified you want the job to resubmit itself several times but want to stop after the completion of the current process, you can create a file called stop_run in the control directory.
This will prevent payu from submitting another job.
Error and output log files
PBS output files
When the model fails or completes a run, PBS writes the standard output and error streams to two files inside the control directory: <jobname>.o<job-ID> and <jobname>.e<job-ID>, respectively.
These files usually contain logs about payu tasks, and give an overview of the resources used by the job.
To move these files to the archive directory, use the following commmand:
payu sweep
Model log files
While the model is running, the standard output and error streams are saved in the control directory. Refer to the Run a Model page for the model you are using for the list of logging filenames for your model.
You can examine the contents of these files to check on the status of a run as it progresses (or after a failed run has completed).
Warning
At the end of a successful run, the model log files are archived to the archive directory and will no longer be found in the control directory. If they remain in the control directory after the PBS job for a run has completed, it means the run has failed.
Trouble-shooting
If payu doesn't run correctly for some reason, a good first step is to run the following command from within the control directory:
payu setup
This command will:
- create the laboratory and
workdirectories based on the experiment configuration - generate manifests
- report useful information to the user, such as the location of the laboratory where the
workandarchivedirectories are located
This can help to isolate issues such as permissions problems accessing files and directories, missing files or malformed/incorrect paths.
Edit a payu configuration
The modifications discussed in this section can change how the model and its components are configured, or the way the model is run by payu.
The config.yaml file located in the control directory is the payu configuration file, which controls the general model configuration. It contains several parts, some of which are more likely to need modification, and others which are rarely changed without having a deep understanding of how the model is configured.
To find out more about configuration settings for the config.yaml file, refer to how to configure your experiment with payu.
Change run length
Adjusting the duration of the model run is one of the most common change to apply. However, models follow different ways to adapt the duration of the run. Please refer to the Run a Model page of the model of your choice for information
Start the run from a specific restart file
To configure the experiment to start from specific restart files, add a restart: entry to the config.yaml file, specifying the path to a folder containing existing restart files.
Or, to do this automatically when setting up an experiment, add the -r flag to the payu clone command.
Warning
In some cases, if the supplied restart file is not fully compatible with the model configuration, experiments using a custom restart file may require additional manual adjustments to run correctly.
Warning
The restart option used here will only be applied if there is no restart directory in archive, and so does not have to be removed for subsequent submissions. See Payu docs for further details.
Modify PBS resources
If the model has been altered and needs more time or memory to complete, or needs to be submitted under a different NCI project, you will need to modify the following options in the config.yaml:
# If submitting to a different project to your default, uncomment line below
# and replace PROJECT_CODE with appropriate code. This may require setting shortpath
# project: PROJECT_CODE

# Force payu to always find, and save, files in this scratch project directory
# shortpath: /scratch/PROJECT_CODE

queue: normal
walltime: 3:00:00
mem: 1000GB
jobname: 1deg_jra55_ryf
These lines can be edited to change the PBS directives for the PBS job.
For example, to run under the ol01 project (COSIMA Working Group), uncomment the line beginning with # project by deleting the # symbol and replace PROJECT_CODE with ol01:
project: ol01
For model configurations and output to be saved to a /scratch storage allocation other than project (or your default if project is not set) then also set shortpath to the desired path.
Warning
If changing the project providing the compute resources during an experiment, set the shortpath field so that it's the same for all runs of an experiment.
Doing this will make sure the same /scratch location is used for the laboratory, regardless of which project is used to run the experiment.
Syncing output data to long-term storage
The laboratory directory is typically under the /scratch storage on Gadi, where files are regularly deleted once they have been unaccessed for a period of time. For this reason climate model outputs need to be moved to a location with longer term storage.
On Gadi, this is typically in a folder under a project code on /g/data.
Payu has built-in support to sync outputs, restarts and a copy of the control directory git history to another location.
This feature is controlled by the following section in the config.yaml file:
# Sync options for automatically copying data from ephemeral scratch space to
# longer term storage
sync:
    enable: False # set path below and change to true
    restart: True
    path: none # Set to location on /g/data or a remote server and path (rsync syntax)
    exclude:
      - '*.nc.*'
      - 'iceh.????-??-??.nc'
enable to True, and set path to a location on /g/data, where payu will copy output and restart folders. A sensible path could be: /g/data/$PROJECT/$USER/<model>/<experiment_name>/.
Pruning model restarts
By default, restart files are created at the end of each run, allowing subsequent simulations to resume from a previously saved model state. However, restart files can occupy significant disk space, and keeping all of them throughout an entire experiment is often not necessary.
If disk space is limited, consider using payu's restart files pruning feature, controlled by the restart_freq field of the config.yaml.
By default, every restart_freq, payu removes intermediate restart files, keeping only:
- the two most recent restarts
- restarts corresponding to the
restart_freqinterval
For example, a restart_freq set to 1YS would keep the restart files at the end of each model year, whereas restart_freq set to 5YS would keep those at the end of every fifth model year.
This approach helps reduce disk space while maintaining useful restart points across long experiments, especially useful in case of unexpected crashes.
The restart_freq field in the config.yaml can either be a number (in which case every nth restart file is retained), or one of the following pandas-style datetime frequencies:
YS→ start of the yearMS→ start of the monthD→ dayH→ hourT→ minuteS→ second
For example, to preserve the ability to restart the model every 50 model-years, set:
restart_freq: '50YS'
The most recent sequential restarts are retained, and only deleted after a permanently archived restart file has been produced.
Note
If restart_freq is not a multiplier of the model's restart frequency, payu will keep the first restart passed restart_freq. For example, a model is set to write restart files every 3 years and produces restarts on the following dates:
- restart000: 01/01/2000
- restart001: 01/01/2003
- restart002: 01/01/2006
- restart003: 01/01/2009
- restart004: 01/01/2012
- restart005: 01/01/2015
If restart_freq is set to 5YS (5 years), payu will keep:
- restart000: 01/01/2000
- restart002: 01/01/2006 (first restart date on or after 01/01/2005)
- restart004: 01/01/2012 (first restart date on or after 01/01/2011)
- restart005: 01/01/2015 (keeps immediate restarts before 01/01/2017)
For more information, check payu Configuration Settings documentation.
Other configuration options
Warning
The following sections in the config.yaml file control configuration options that are rarely modified, and often require a deeper understanding of how the model is structured to be safely changed.
Model configuration
This section tells payu which driver to use for the main model configuration and the location of all input files that are common to all its model components.
name: common
model: access-om2
input: /g/data/ik11/inputs/access-om2/input_20201102/common_1deg_jra55
The name field, for the model section, is not actually used for the configuration run, so it can be safely ignored. The name field is used for submodels (see below).
Submodels
Coupled models deploy multiple submodels, a.k.a. the model components.
This section of the payu configuration file specifies the submodels, the configuration options required to execute the model correctly and the location of all inputs required for this submodel.
Runlog
runlog: true
runlog is set to true.
Warning
This should not be changed as it is an essential part of the provenance of an experiment.
payu updates the manifest files for every run, and relies on runlog to save this information in the git history, so there is a record of all inputs, restarts, and executables used in an experiment.
Userscripts
userscripts:
    error: tools/resub.sh
    run: rm -f resubmit.count
    sync: /g/data/vk83/apps/om2-scripts/concatenate_ice/concat_ice_daily.sh
A dictionary to run scripts or subcommands at various stages of a payu submission:
errorgets called if the model does not run correctly and returns an error code.rungets called after the model successful execution, but prior to model output archive.syncgets called at the start of the sync pbs job. For more information refer to Syncing output data.
For more information about specific userscripts fields, check the relevant section of payu Configuration Settings documentation.
Postscripts
Postprocessing scripts that run after payu has completed all steps of each run (for example, with payu run -n 10, the postscript will run 10 times). Scripts that might alter the output directory, for example, can be run as postscripts. These run in PBS jobs separate from the main model simulation.
postscript: -v PAYU_CURRENT_OUTPUT_DIR,PROJECT -lstorage=${PBS_NCI_STORAGE} ./scripts/NetCDF-conversion/UM_conversion_job.sh
Miscellaneous
The following configuration settings should never require changing:
stacksize: unlimited
qsub_flags: -W umask=027
Edit a model components' configuration
Each of the model components contains additional configuration options that are read in when the model component is running.
These options are typically useful to modify the physics used in the model, the input data, or the model variables saved in the output files.
These configuration options are specified in files located inside a subfolder of the control directory, named according to the submodel's name specified in the config.yaml submodels section (e.g., configuration options for the ocean component are in the ocean sub-directory).
To modify these options please refer to the configurations documentation of the respective model component, found on the Run a Model page for your chosen model.