Tutorial: Running ACCESS-ESM1.6
Introduction
Welcome to the How to run ACCESS-ESM1.6 training session. In this session, you'll get hands on experience of running and configuring ACCESS-ESM1.6, the recently released earth system model developed for Australia's contribution to the CMIP7 Assessment Fast Track. During this session, we'll cover:
- What ACCESS-ESM1.6 is, and how it differs to the older model ACCESS-ESM1.5
- How to clone and run ACCESS-ESM1.6 configurations using payu on Gadi
- Key payu commands and concepts for managing climate model simulations
- How to customise ESM1.6 configurations
- Where to find more information and get help
Prerequisites
To complete the hands on sections of this tutorial, you will need to have:
- A current NCI account
- A GitHub account
- A MOSRS account and to have completed the UKMO EULA signing instructions
- Be a member of the NCI projects:
vk83: Project for accessing ACCESS-NRI modelsnf33: Project for ACCESS-NRI training eventsjq44: Project containing released output data from ACCESS-ESM1.6 experiments
Note
If you haven't completed these prerequisites you're welcome to work with someone else for the hands on sections of the tutorial.
In addition, the following background is recommended for the hands on portions of this session:
- Some experience working on NCI will be helpful.
- Some familiarity with git and GitHub workflows will be helpful.
- Some familiarity with the Unix command line will be helpful.
- Understanding of basic climate model concepts
Introduction to ACCESS-ESM1.6
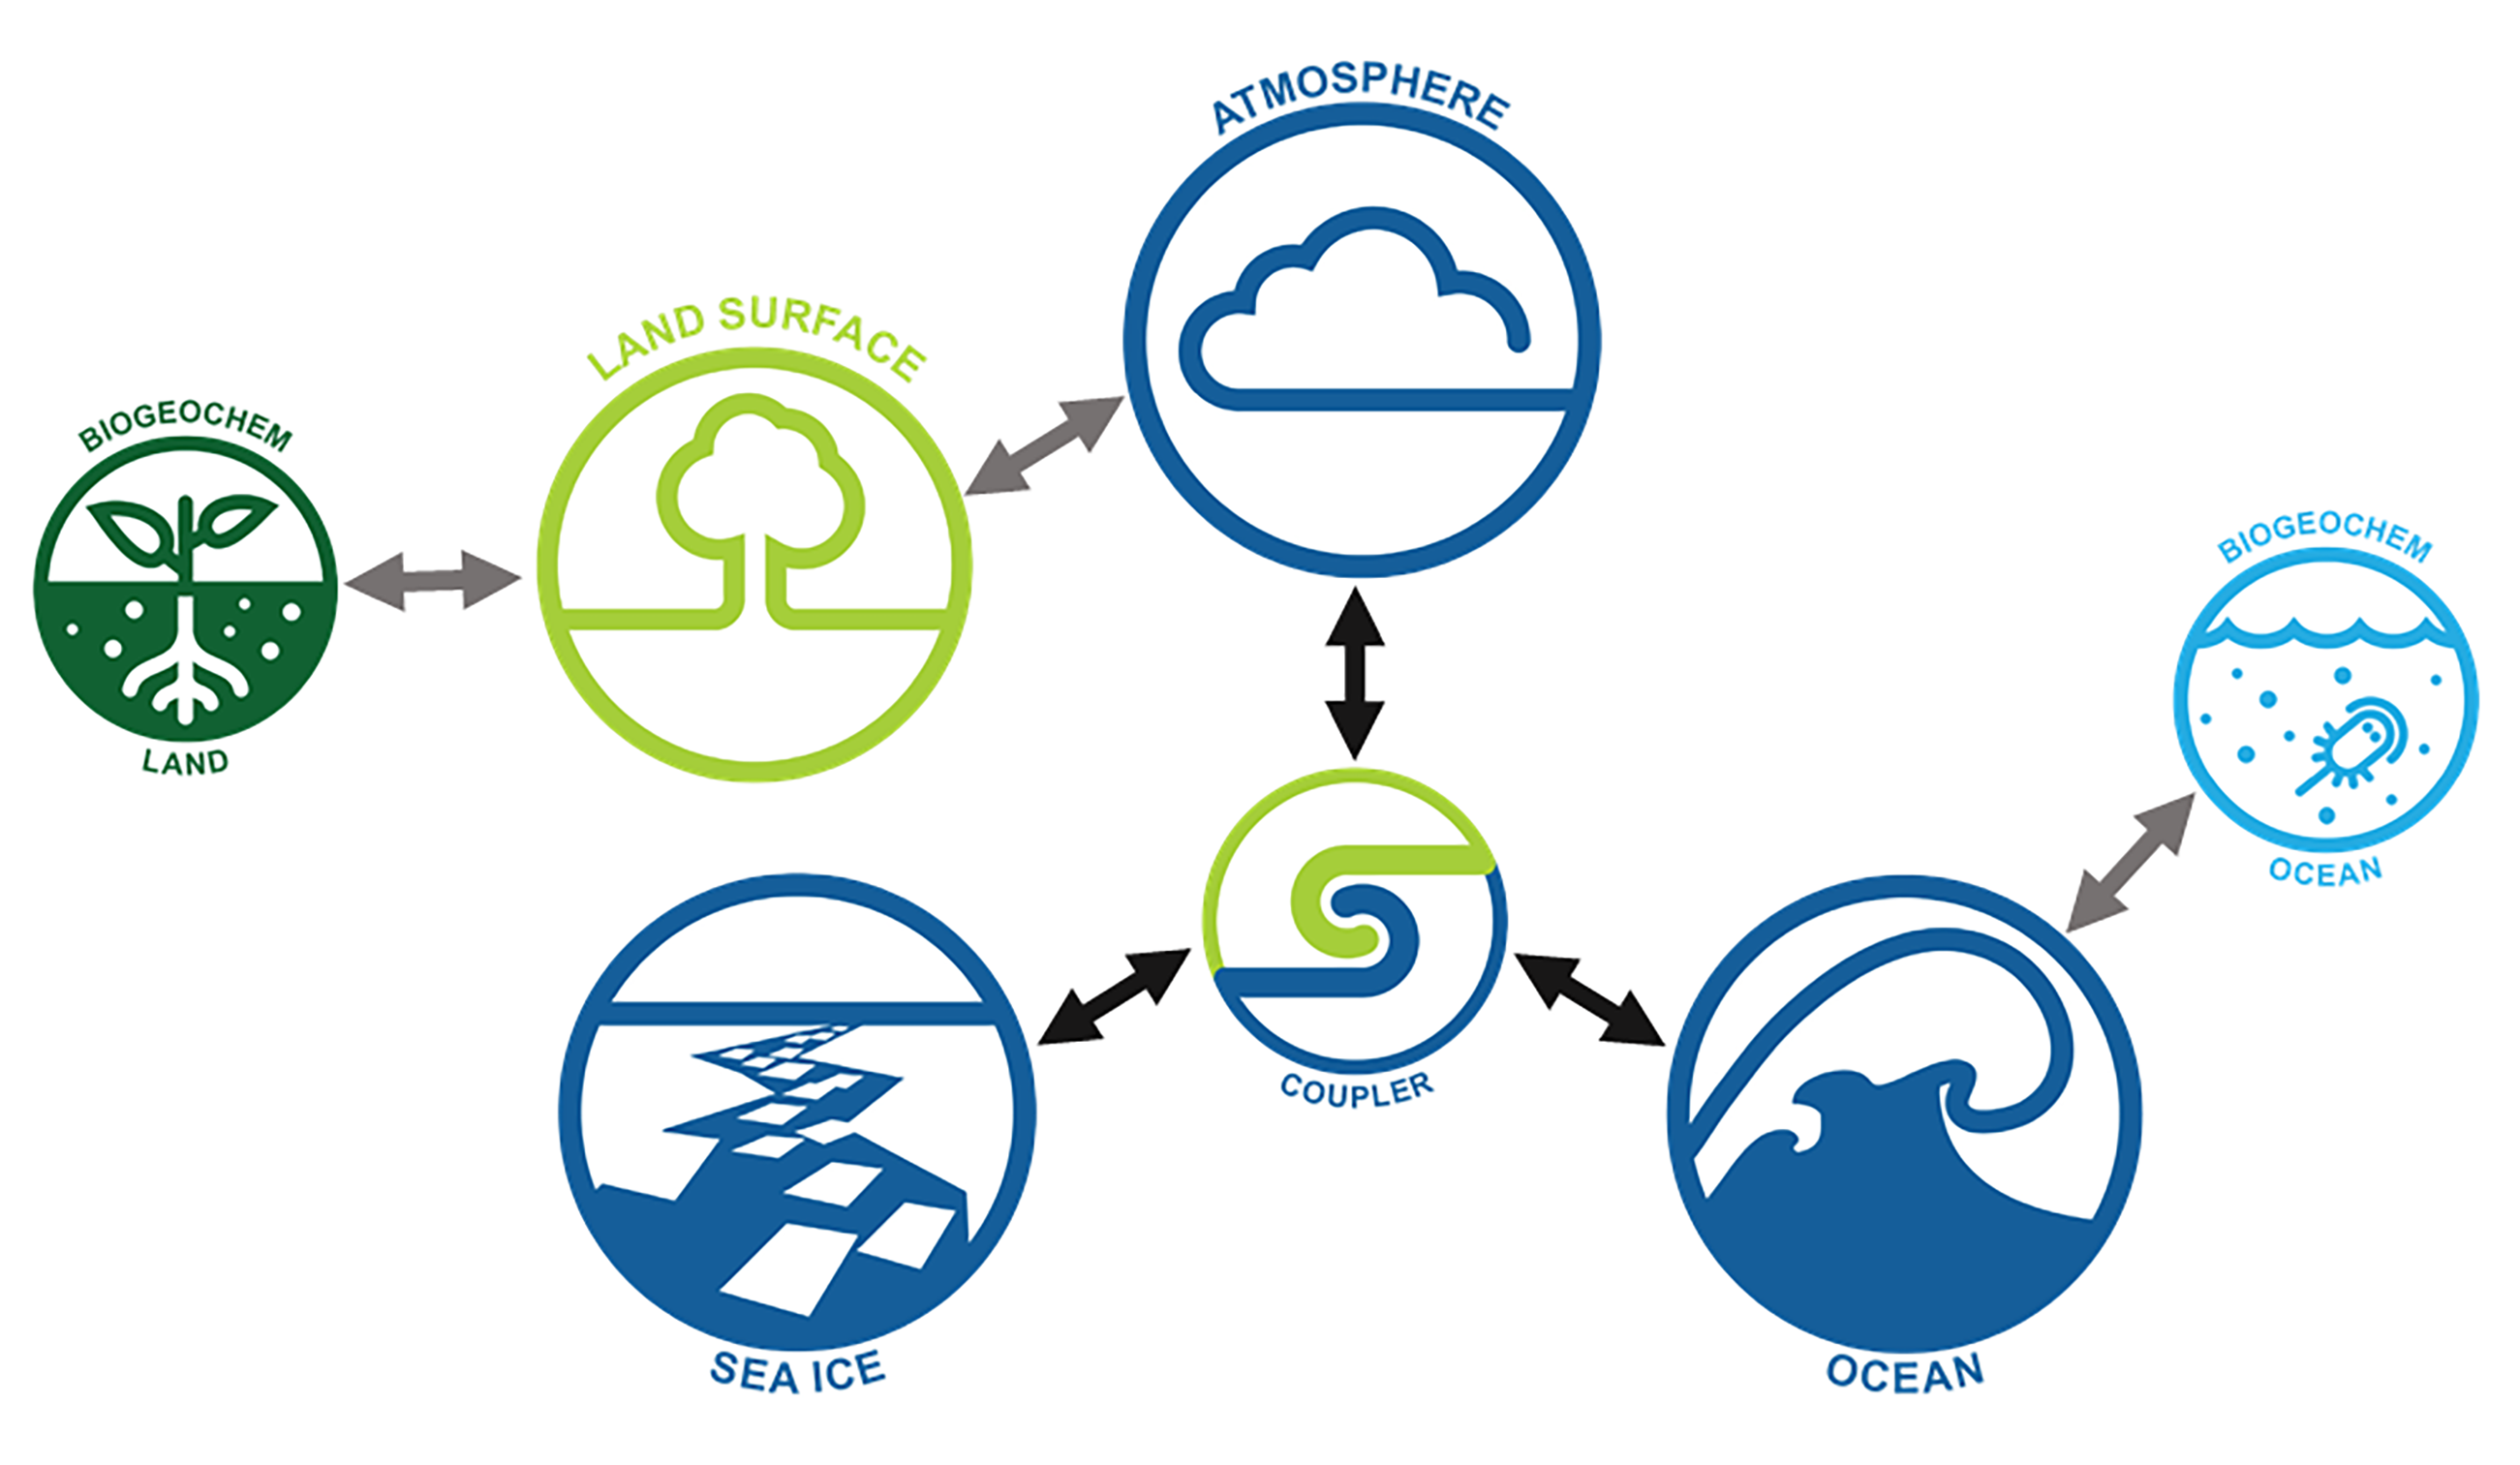
ACCESS-ESM1.6 is a global coupled earth system model containing active atmosphere, ocean, sea ice, land, and biogeochemistry components. The model supports both a prescribed CO2 concentrations mode, and a fully interactive carbon mode where carbon is coupled between the model components.
ACCESS-ESM1.6 development used ACCESS-ESM1.5 as a base and brought in many significant changes. Some of the main changes are listed in the drop down below:
Main changes
-
A new ocean BGC model, WOMBATlite, with an updated Fe cycle, photo-acclimation of phytoplankton, spatially variable sinking rates of particulate organic matter, and improved CO2 fluxes.
-
The CABLE2.4 land model has been updated to CABLE3, with new features including as Australian plant types and improvements to energy and water conservation.
-
CICE4 has been replaced with CICE5, which brings bug fixes to key diagnostics. CICE5 has been configured to use the same zero layer thermodynamics scheme.
-
An iceberg spreading scheme has been added, where meltwater from the icesheets is distributed both around the coast, and according to a wider iceberg melt pattern.
-
Released scientific configurations have been developed to match the CMIP7 experiment protocols, including updated atmospheric forcings.
-
Optimised for Gadi. While ESM1.6 is more computationally complex than ESM1.5, it runs roughly 25% faster.
-
Model outputs conform to the new ACCESS-NRI data specification, with the aim of making model output simpler to work with and to improve provenance information. Key changes include using single variable files with consistent file names for all model components, and adding provenance information into the output metadata.
In the following sections of the tutorial, we'll run our own simulations of ESM1.6 by:
-
Connecting to the NCI computer gadi and loading the simulation management software payu
-
Using payu to clone a released ACCESS-ESM1.6 configuration from GitHub
-
Using payu to run a simulation based on the configuration
flowchart TB
    subgraph FIRST["<b>Stage 1: Get your first model running!</b>"]
        direction LR

        A["🌏 <b>Introduction to ACCESS-ESM1.6</b><br/><br/>What's new?<br/><br/><b>~10 min</b>"]

        B["🛠️ <b>Payu Introduction</b><br/><br/>Load payu on Gadi<br/><br/><b>~10 min</b>"]

        C["▶️ <b>Run your simulation</b><br/><i>Exercises 1-6</i> <br/><br/> Clone → setup → run → status <br/><br/><b>~15 min</b>"]

        A --> B --> C
    end
        FIRST -->|"Next: Explore your run"| SECOND

    subgraph SECOND["<b>Stage 2: Explore, customise & configure</b>"]
        direction LR

        D["🔎 <b>Explore Payu</b><br/><i>Exercise 7</i><br/><br/>Learn more about payu's directory structure!<br/><br/><b>~10 min</b>"]

        E["⚙️ <b>Configure your experiment</b><br/><br/>config.yaml, restarts & outputs<br/><br/><b>~15 min</b>"]

        F["🧪 <b>Try it yourself</b><br/><i>Exercise 9</i><br/><br/>Customise & run an experiment<br/><br/><b>~20 min</b>"]

        G["💬 <b>Wrap up</b><br/><br/>Questions, resources & next steps<br/><br/><b>~10 min</b>"]

        D --> E --> F --> G
    end


    %% Theme-friendly colour coding:
    %% keep Mermaid/MkDocs background + text colours,
    %% and colour only the outlines.

    classDef intro stroke:#3B82F6,stroke-width:3px;
    classDef setup stroke:#8B5CF6,stroke-width:3px;
    classDef run stroke:#16A34A,stroke-width:3px;
    classDef explore stroke:#0EA5E9,stroke-width:3px;
    classDef configure stroke:#F59E0B,stroke-width:3px;
    classDef handsOn stroke:#10B981,stroke-width:4px;
    classDef wrap stroke:#64748B,stroke-width:3px;

    class A intro;
    class B setup;
    class C run;
    class D explore;
    class E configure;
    class F handsOn;
    class G wrap;

    %% Keep the section containers subtle and theme-compatible
    style FIRST fill:transparent,stroke:#64748B,stroke-width:1px
    style SECOND fill:transparent,stroke:#64748B,stroke-width:1px
While the simulations are running, we'll learn more about key payu commands, how configurations are structured, and how to run a customised simulation.
Introduction to payu
Payu is a workflow manager for running numerical models in supercomputing environments. Payu is designed to help users set up, run, and manage climate simulations, and provides a consistent set of commands and concepts which can be used accross several models including ACCESS-OM3 and ACCESS ESM1.6.
Info
For in-depth information about payu, visit the payu documentation.
Exercise 1: Activating payu on gadi
Payu is made available as a module on Gadi. To enable payu commands, log onto Gadi and run:
module use /g/data/vk83/modules
module load payu
To check that the payu module has loaded properly, we can test out running a simple command:
payu --version
This should print out the version of payu that's been loaded: payu 1.3.5.
Exercise 2: Cloning an ACCESS-ESM1.6 configuration
Running a climate model requires you to collect a large number of files including:
-
model executables,
-
collection of model input files such as grids and forcings,
-
configuration files to control the model's scientific options, and an initial state for the model to start from.
A payu configuration can be thought of a prebuilt bundle of all these requirements, making it easy to get a simulation running. Different scientific configurations of the model can be stored in different payu configurations.
Released ACCESS-ESM1.6 configurations are published on the ESM1.6 configurations GitHub repository, where different configurations are stored under different git branches. The branches for the ACCESS-ESM1.6 configurations which have been released by ACCESS-NRI are:
- release-piControl: The CO2 concentrations driven pre-industrial control
- release-esm-piControl: The emissions driven pre-industrial control
- release-historical: The CO2 concentrations driven historical configuration
- release-esm-historical: The emissions driven historical configuration
Note
Additional configurations, including AMIP and future scenarios, are currently being prepared for release.
The first step in running an ESM1.6 simulation is to select a configuration from the repository, and make a local copy of it on Gadi (i.e. clone). The following steps outline how to do this:
-
Create a directory to keep your payu experiments
Choose a location on Gadi for storing your payu control directories. It's recommended to use a directory under $HOME, for example:
cd ~ mkdir ACCESS-ESM1.6 cd ACCESS-ESM1.6 -
Start the payu clone interactive prompt
Next run the
payu clonecommand. This will activate an interactive prompt where we specify the configuration we want to clone, where we want to copy it to, and the name we want to use for the experiment:payu clone -
Select the GitHub repository to clone a configuration from
The first prompt asks for a url to the GitHub repository where we want to clone a configuration from. Here, we'll specify the ACCESS-ESM1.6 configurations repository
https://github.com/ACCESS-NRI/access-esm1.6-configs>> Please enter URL of the repository, or local path of the configuration to clone: (e.g., https://github.com/payu-org/bowl1.git, or /path/to/local/experiment; 'Tab' to browse, '/' to enter folder) https://github.com/ACCESS-NRI/access-esm1.6-configs -
Select the branch from the repository you would like to clone
The prompt then asks if we want to clone from a branch, or a specific tag or commit in the repository. Since the released ESM1.6 configurations are stored using git branches, we'll select
An existing branch:>> Payu will clone the repo based on: An existing branch -
Select the branch to clone
The next prompt asks which branch we would like to clone. You are welcome to use any of the four release configurations listed previously. For this example, I'll use the emissions driven pre-industrial control:
release-esm-piControl>> Name of the branch to clone ('Tab' to browse all branches): release-esm-piControl -
Select a directory name for the cloned configuration
Next, we need to select a name for the directory that the configuration will be copied into. This directory is referred to as the control directory, and payu will create it for us as part of the cloning step. Any descriptive name is suitable, and here I'll use
tutorial-experiment:>> Please name your local control directory: (See 'Control directory and branch naming guidance' in the documentation.) tutorial-experiment -
Select whether to create a new experiment
The prompt asks wehether we'll be creating a new experiment. Select
Yes, create a new UUID as a new experiment:>> Is this a new experiment? (If yes, payu will create a new branch.) Yes, create a new UUID as a new experiment -
Choose a name for the local branch
With the above choice, payu will create a new branch in the local clone of the repository to hold our experiment. Select a descriptive name, here I'll use
simulation-1:>> Please name your new branch: (Note: this won't be shared to the online repository automatically) simulation-1 -
Select a restart
The next prompt asks if we want to specify a custom initial condition for the model to start from, or if we want to use the default restart files from the configuration. Select
Noto choose the default restart from the configuration.>> Do you want to specify a custom restart path? (If no, the default restart/initial conditions will be used.) No -
Select an experiment shortpath
The final prompt specifies the top-level directory which payu will use for storing model output and temporary workspaces. This should generally take the form
/scratch/<project>and we'll learn a bit more about this later in the session. IfNois selected, the user's current project will be used.In this session we'll be using the storage resources from the NRI training project
nf33. SelectYesand then enter/scratch/nf33into the next prompt:>> Do you want to override the shortpath? (Default is '/scratch/$PROJECT') Yes >> Please enter the new shortpath you want to use: /scratch/nf33mkdir -p ~/ACCESS-ESM1.6/ cd ~/ACCESS-ESM1.6/ payu clone Welcome to the Payu Clone Wizard! Press 'Ctrl+C' at any time to exit. ? Please enter the URL of the repository, or the local path of a configuration you want to clone: (e.g., https://github.com/payu-org/bowl1.git or /path/to/local/experiment; 'Tab' to browse, '/' to enter folder) https://github.com/ACCESS-NRI/access-esm1.6-configs ? Do you want to clone the repo based on: An existing branch >> Name of the branch to clone ('Tab' to browse all branches): release-esm-piControl? Name of the branch to clone ('Tab' to browse all branches): release-esm-piControl ? Please name your local control directory: (See 'Control directory and branch naming guidance' in the documentation.) tutorial-experiment ? Is this a new experiment? (If yes, payu will create a new branch.) Yes, create a new UUID as a new experiment ? Please name your new branch (Note: this won't be shared to the online repository automatically) simulation-1 ? Do you want to specify a custom restart path? (If no, the default restart/initial conditions will be used.) No ? Do you want to override the shortpath? (Default is '/scratch/\({PROJECT}\)') No Running command: `payu clone -B release-esm-piControl -b simulation-1 https://github.com/ACCESS-NRI/access-esm1.6-configs tutorial-experiment` Cloned repository from {{ github_configs }} to directory: /home/561/$USER/ACCESS-ESM1.6/tutorial-experiment Created and checked out new branch: simulation-1 laboratory path: /scratch/${PROJECT}/${USER}/access-esm binary path: /scratch/${PROJECT}/${USER}/access-esm/bin input path: /scratch/${PROJECT}/${USER}/access-esm/input work path: /scratch/${PROJECT}/${USER}/access-esm/work archive path: /scratch/${PROJECT}/${USER}/access-esm/archive Updated metadata. Experiment UUID: 14058c5c-d0dd-49dd-841a-cbec42b7391e Added archive symlink to /scratch/${PROJECT}/${USER}/access-esm/archive/tutorial-experiment-simulation-1-14058c5c To change directory to control directory run: cd tutorial-experiment -
Navigate into the control directory
We should now see a newly created directory which contains our cloned configuration. This is reffered to as the control directory:
ls
tutorial-experiment
Navigate into the newly created control directory:
cd tutorial-experiment
Exercise 3: Setting project for computation
By default, payu will use your currently active project on Gadi for both computation and storage. To check what project is currently active, you can run
echo $PROJECT
For this training session, we'll be using resources from project nf33. Payu allows you to select a non-default project in the config.yaml file, which is the main configuration file used to control a payu simulation. We'll go through more details of what you can control in the config.yaml file after we've set off the simulations.
We've already set the storage project to nf33 during the payu clone step, and now just need to set the project used for computation resources. To do this, make the following change to the config.yaml file:
# If submitting to a different project to your default, uncomment line below
# and replace PROJECT_CODE with appropriate code. This may require setting shortpath
-# project: PROJECT_CODE
+project: nf33
Exercise 4: Check the configuration is properly set up
When cloning or modifying a configuration, it's recommended to first check for common errors such as inaccessible files or incorrectly configured options before running a simulation. We can do this by running the payu setup command, which carries out the preparation tasks involved in running a simulation, but stops just before actually starting the model. If payu notices any problems in the configuration, it will produce an error and inform the user.
Check that your configuration is properly set up and you have access to all the required files:
payu setup
Once the command completes, well see a new symbolic link in the control directory pointing to a work directory, a temporary workspace that payu uses to run its simulations.
Exercise 5: Running the simulation
To set off a one year simulation of your configuration, run:
payu run
Hint
Unfortunately, the above command will have led to the following error:
[ERROR] Work path already exists. Please use `payu sweep` or use `payu run -f`.
work directory for your experiment already exists, in this case because we manually ran the payu setup command. To get around this error, add the -f flag to the command:
payu run -f
The one year simulation will take around 55 minutes to complete. The data post processing which runs in a separate job can take up to another hour, and so final outputs won't be available by the end of the session.
Excercise 6: Check the status of your simulation
To confirm that our simulation has been sent to the PBS queue, we can use the payu status command. This command reports the current status of a simulation: whether it's queued, running, or in the finishing stages. It will also tell us if an experiment has crashed, which can occur for different reasons including temporary problems on Gadi, numerical instabilities in the model, or problems with the way a configuration's been set up.
Confirm that your simulation has been sent to the PBS queue by running:
payu status
While the simulations are running, we'll discuss some more features of payu and ACCESS-ESM1.6.
Exercise 7: Understanding payu's directory structure
In this exercise, we'll learn about the directory structure that payu uses to run a simulation. We'll learn about the purposes of the control directory, the archive directory, the work directory and how these three relate to each other.
- The top-level directory containing the
config.yamlfile is called the control directory. The files in this directory and its subdirectories:atmosphere,ocean,ice,couplerare used to configure the model simulation, and we run all our payu commands (except forpayu clone) from this directory. - The control directory contains a symbolic link to the archive directory. This is a location on scratch where payu stores the model outputs and restart files at the end of a simulation.
- The work directory is a temporary workspace used to run the model. Payu collects all the model executables, input files, configuration files, and restart files into the work directory and organises them into the structure required by the model code.
For further details on the directory structure used by payu, take a look at the how to run ESM1.6 documentation.
In the following exerises, we'll take a look at the work directory being used by our currently running simulations, and we'll see how payu uses information from the control directory to create this temporary work space.
-
In the
config.yamlfile, you'll see lists of filepaths associated with each model component, for example:- name: atmosphere model: um ncpus: 256 exe: um_hg3.exe input: - /g/data/vk83/configurations/inputs/access-esm1p5/share/atmosphere/spectral/resolution_independent/2020.05.19/spec3a_sw_hadgem1_6on ... - name: ocean model: mom ncpus: 240 exe: mom5_access_cm input: - /g/data/vk83/configurations/inputs/access-esm1p6/modern/share/ocean/biogeochemistry/global.1deg/2025.09.22/SFe_Hamiltonetal2020_monthly_clim.nc ...Take a look through the files in the
workdirectory. Can you see how payu has used these paths from theconfig.yamlwhen constructing the work directory?Hint
Take a look in the
work/atmosphere/INPUTandwork/ocean/INPUTdirectories. -
The above section of the config.yaml specifies names for the model executable:
exe: um_hg3.exeandexe: mom5_access_cm. Can you see what payu has done with these executables when constructing theworkdirectory?Hint
Take a look in the
work/atmosphereandwork/oceandirectories. -
Along with model executables and input files, a simulation needs configuration files which control each submodel's scientific options. For example, the
namelistsfile under theatmospheresection of the control directory controls the atmosphere model's scientific settings. Can you see how payu has used this file when constructing theworkdirectory.Hint
Take a look in the
work/atmospheredirectory.
Stretch exercise
In the manifests directory, the files input.yaml, exe.yaml, and restart.yaml all contain lists of filepaths. How do these filepaths relate to the settings in the config.yaml? What do the md5 fields contain?
Hint
The md5 fields contain md5 hashes calculated for each of the hashes, and can be used to verify that input files have not been changed. Payu updates these files during the setup stage.
Excercise 8: Check the status the running simulations
Our simulations should now have left the queue and started running. To check how far they've progressed, we can rerun the payu status command which will report the current model date.
Check where your simulation is up to by running:
payu status
Configuring an ESM1.6 simulation
The config.yaml file
The config.yaml controls how payu sets up, runs, and archives a simulation. We'll only touch on a small selection of of the settings in this tutorial, but we recommend reading the how to run ACCESS-ESM1.6 documentation and payu documentation for details on everything you can control from the config.yaml file.
Compute project and storage location
We've already modified our config.yaml file to use project nf33 for the both the computation and storage resources. However it's common to need to use one project for computation and another for storage. To set this up, you can specify
project: <COMPUTE PROJECT>
shortpath: /scratch/<STORAGE PROJECT>
The restart file
The following line specifies the initial restart file used in the release-esm-piControl experment:
restart: /g/data/vk83/configurations/inputs/access-esm1p6/modern/pre-industrial-emissions/restart/2026.02.23
Restart pruning
By default, restart files are created at the end of each run, allowing subsequent simulations to resume from a previously saved model state. However, restart files can occupy significant disk space, and keeping all of them throughout an entire experiment is often not necessary. Payu can be configured to only keep a subset of the restarts according to a selected frequency.
The setting below tells payu to only keep every 10th year's restart files:
restart_freq: 10YS
Syncing model outputs
The archive directory is typically under the /scratch storage on Gadi, where files are regularly deleted once they have not been accessed for a period of time. It's common to copy a simulations outputs over to a location on /g/data to preserve them while doing analysis.
Rather than copying the outputs manually, you can use the sync settings to get payu to automatically sync the outputs and restart files to a specified location at the end of each run segment.
For example, the following changes will sync the archived data to a location on /g/data/nf33/
# Sync options for automatically copying data from ephemeral scratch space to
# longer term storage
sync:
-   enable: False # set path below and change to true
+   enable: True
    restarts: True
-   base_path: null # Set to location on /g/data (e.g., /g/data/$PROJECT/$USER/)
+   base_path: /g/data/nf33/<user>/tutorial_experiments/
Configuring individual submodels
Configuration files for each of ESM1.6's submodels can be found in the ocean, atmosphere, ice and coupler directories within the control directory.
Customising the configuring components usually requires in-depth knowledge of the components, and the Hive Forum can be a good place to seek advice fromt the wider community and ACCESS-NRI staff.
Exercise 9: Running a custom configuration
In this exercise, we'll get some practice using the settings described above. We'll clone and run another configuration and customise it to use a different restart file, to activate syncing, and to modify the scientific configuration for the atmosphere submodel.
A selection of restart files from the ESM1.6 CMIP7 piControl experiment are available in the restart000, restart001 ... directories in /g/data/jq44/access-nri/access-esm1p6/global/piControl/r1i1p1f1/2026.04.2. Each restart directory corresponds to the end of a different year of the experiment. Follow the steps below to run a customised experiment:
- Clone the
release-piControlconfiguration into a new control directory namedtutorial-customlocated under~/ACCESS-ESM1.6. Remember to set the storage and compute project options tonf33 - Set your experiment to use a selected restart from the above location. You can set this either during the
payu clonecommand, or by editing theconfig.yamlfile after the cloning step. - Modify the
config.yamlto enable the output syncing. Configure payu to sync the model outputs and restarts to/g/data/nf33/<user>/tutorial_experiments, where<user>is your gadi username. - The
release-piControlconfiguration prescribes an atmospheric CO2 mass mixing ratio (MMR) of 4.3189e-04. This value is controlled by theCO2_MMRsetitng in thenamelistsfile under the atmosphere directory. Find where this is set, and change it to a value of your choice (For example 8.6378e-04 for doubled CO2). - Setup and run your simulation – check back tomorrow and if everything has worked you should find a copy of your outputs in
/g/data/nf33/<user>/tutorial_experiments.
Further resources and getting help
This session has been a brief introduction to running ACCESS-ESM1.6 with payu. We've only had time to introduce the basics, and you may be interested to learn more about creating custom ESM1.6 configurations and more advanced payu features, including:
- Customising submodel configurations
- Modifying model source code and building your own executables
- Controlling model output variables
- Sharing payu experiments with git and GitHub
- Advanced experiment workflows with payu
For details these topics, you can refer to:
- The How to run ACCESS-ESM1.6 documentation page
- The ACCESS-ESM1.6 configuration docs
- The payu documentation
- For information on the model's scientific configuration, there will be a model description paper published in the future.
ACCESS-NRI staff are also available to answer your questions on the ACCESS-Hive Forum. If you have any questions related to ACCESS-ESM1.6, you are welcome to add a help request on the Forum.
Extension sections
The following sections are included as extensions for those who are familiar with running climate simulations with payu, and have already completed the main portion of the tutorial. These sections provide more information on the new ACCESS-NRI data specifications and the structure of ESM1.6's outputs, and introduce some of payu's advanced provenance features.
ACCESS-ESM1.6 outputs and the ACCESS-NRI data spec
ACCESS-ESM1.6 is the first model whose outputs adhere to the new ACCESS-NRI data specifications. The goal of these specifications is to ensure that model output from different ACCESS models have both consistent structure and metadata, and to improve ease of use for working with the data.
Key changes in ACCESS-ESM1.6's output data compared to ESM1.5 include:
- Single variable files are produced for all three model components.
- Outputs for all model components follow a consistent naming scheme, with core metadata embedded in the names. For example:
- ocean:
access-esm1p6.mom5.2d.psiu.1mon.mean.1850.nc - atmosphere:
access-esm1p6.um7p3.2d.fld_s03i237.1mon.mean.1850.nc - ice:
access-esm1p6.cice5.3d.siitdconc.1mon.mean.1850.nc
- ocean:
- Consistent provenance data is added to the netCDF global attributes:
:base_configuration = "dev-preindustrial+concentrations" ;
:contact = "<email-address>" ;
:Conventions = "CF-1.11,ACDD-1.3" ;
:data_specification = "ACCESS-Output Data Specification v0.1.0-alpha" ;
:date_created = "2026-08-11T02:21:26Z" ;
:date_metadata_modified = "2026-08-11T02:22:15Z" ;
:date_modified = "2026-08-11T02:22:15Z" ;
:experiment_repo = "https://github.com/ACCESS-NRI/access-esm1.6-configs" ;
:experiment_uuid = "0dab21b3-892f-41dd-afb4-21198a7ef648" ;
Take a look at the output in /g/data/jq44/access-nri/access-esm1p6/global/piControl/r1i1p1f1/2026.04.22/output000 to see how the model output data is structured, and feel free to raise any questions with NRI staff. See the data specifications documentation for further details on the ACCES-NRI data specifications.
Exercise 9: Runlogs, manifests, and experiment provinence
A core principle of payu's design is to make experiment provenance easy. Payu automatically tracks configuration settings, input, restart, and executable paths throughout an experiment, recording this information with git.
This information can be used in many different ways, an example of which we'll see in the (made up) example of below:
I've been running a historical simulation using a custom volcanic forcing input file volcts_cmip7.dat. I inadvertently modified the file part way through the experiment, and will need to rerun the the years after it changed. Unfortunately, I don't know when during the simulation the input file changed.
Using either the output directories in /g/data/nf33/sw6175/runlogs-exercise/custom_volcanic-custom-volcanic-5a0df8c5, or the published experiment repository in https://github.com/blimlim/runlog_example, can you work out at which point the volcanic forcing file changed?,
Hint: Take a look at the files found in the manifest directories.
Note
While this example is a little contrived (payu will guard against changes to the input files when the manifest: reproduce: input: true option is included in the config.yaml), there have been several times during the development of ESM1.6 where the experiment runlogs have been helpful for investigating similar issues.